Optical Tissue Clearing For Pristine Sample Preparation

Optical tissue clearing is an essential step in high-resolution microscopy. Heather-Brown Harding, PhD, discusses the available techniques.
Imaging deep into tissues has always been difficult, whether challenges derive from working distance, light absorption by natural chromophores, or light scattering by mismatched refractive indexes. Cells are full of mismatched refractive indexes, which is great for DIC but bad for fluorescence. These fluids have a refractive index of 1.35 while lipids and membranes like the golgi and mitochondria have a refractive index of 1.45. Structural proteins such as actin or microtubules can have a refractive index greater than 1.5 – this all means that light will not follow a straight line as it enters and exits the samples. Thus, it is immensely helpful to use a sample preparation method like optical tissue clearing.
The purpose of optical tissue clearing is to create a uniform refractive index throughout the sample and remove some of the chromophores. This is a useful sample preparation technique when you have an opaque biological sample that you need to image through. Tissue clearing is a method that has been around for hundreds of years, but it wasn’t ideal for high-resolution microscopy until the introduction of clarity in 2013 and the use of light-sheet microscopy to address the working distance problem.
There are many different techniques available, and each technique has produced its own subset of variations on the parent technique. However, in general, these variations can be grouped into 3 main categories, which are covered below. We’ll also provide a 4-step guide to sample clearing with some final brief coverage of possible imaging systems.

Optical Clearing Methods
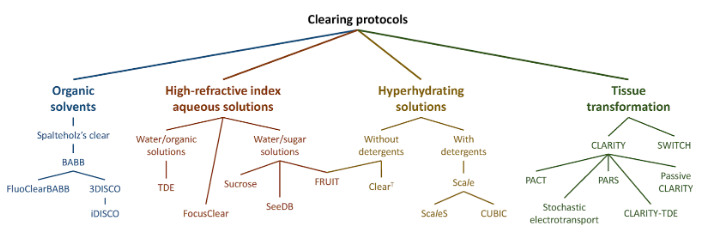
1. Solvent-based clearing.
BABB and DISCO are two major options in solvent-based clearing. The sample preparation generally results in a high refractive index, and are some of the quickest methods due to the use of strong solvents. As a downside, these options are not very friendly to preserving fluorescent proteins. That means no “brainbow” technique for neuroscientists that need to track individual neurons. Additionally, most light-sheet microscopes with a high numerical aperture objective are not compatible with solvent-based clearing. This is because if volatile liquids can slowly dissolve the adhesive on the front lens or otherwise damage the optics – and your core facility may ban you . LaVision has an ultra scope that can work well with solvent-based clearing. This instrument features low-magnification and low-numerical-aperture lenses, which are only good for macro imaging of samples such as whole mouse brains.
2. Hyperhydration-based clearing.
Hyperhydration-based clearing uses UREAs to strip-away lipids. Examples of this method include Scale and CUBIC. Hyperhydration-based clearing results in a refractive index being similar to water, so the sample can be imaged in an aqueous solution. This method is compatible with fluorescent proteins and most light-sheet systems, but it can take weeks––or even months––to prepare the sample. The biggest downside of this technique is very slow sample preparation time. Samples tend to swell up to 150% – similar to expansion microscopy– due to changes in the osmolarity of the sample. This can be a positive or a negative, depending on your sample. The change in size increases effective resolution but makes the sample more fragile.
3. Hydrogel embedding.
This technique takes a number of days to complete, so in terms of time required, it falls between the other items on this list. CLARITY was the earliest option in hydrogel embedding, but subsequently developed methods include PACT, PARS, SWITCH, and a few others. The refractive index of the sample ends up being about 1.45 when using any of these mentioned methods. Furthermore, some of the techniques are fluorescent protein-compatible and provide a faster alternative for hyperhydration-based clearing methods. However, these methods are mostly used with exogenous staining options like immunofluorescent antibodies for the best results. The staining can still take quite some time if you wish to do multiple rounds of staining on a thick tissue sample.
Check here for a full guide to determining which clearing method is right for you.
How To Clear Your Sample
There are 4 general steps to proper sample preparation using clearing methods. Here is a general overview of the procedure to follow in your lab.
1. Pretreatment.
This involves washing and fixing your samples, just as you would for standard sample preparation. If using organs, it’s critical to remove all the blood with saline before fixing because platelets are highly autofluorescent and will ruin your sample.
2. Excess lipid removal.
This step is often called “delipidation.” Lipids cause a lot of light scattering, and they can turn samples such as brains and spheroids opaque. Delipidation is accomplished via permeabilization with detergents such as SDS or Triton-X. Newer methods will follow delipidation by electrophoresis to draw the lipids out more quickly than passive diffusion.
3. Immunolabeling
Immunolabeling is identical to how you would treat uncleared tissue. If your sample doesn’t already have fluorescent proteins expressed within it, you must immunolabel or stain the sample. Remember, a thick tissue section or sample embedded in hydrogel will take quite some time.
4. Clearing and refractive index matching.
There are commercial and homemade reagents that you can use for this final step, and both are dependent on which clearing method you use. For example, you can purchase a solution called “Focus Clear” or make your own solutions of optiview or RIMS for hydrogel embedding methods.
Pick an imaging system
You need an imaging system that is right for your sample and your scientific question. There are a wide range of options these days, and more are developed every year. Currently, your best options include the following:
1. Light-sheet microscopy (LSFM)
This is the most common option for optically cleared tissue samples. These microscopes provide good resolution, and rapidly capture very large volume samples. Newer methods such as lattice light-sheet microscopy (LLSFM) increase the resolution that can be obtained. If you have access to any sort of LSFM, this microscope is the best place to start.
2. Confocal
Confocal can be used to image moderately sized samples, but it’s depth-limited due to the working distance of the objective and the ability to image only one side of the sample. The best objective for cleared tissue or organoid samples is a long working distance water objective. My core has a Plan-Apochromat 40x W /1.1NA longer working distance objective for organoid imaging
3. Macro / stereo microscope
If you have a large sample and don’t require high-resolution stereo microscopes fitted with structured illumination may be a good choice. Yes, this is commonly thought of as a super resolution technique, but it can also be added to a variety of other microscopes. For example, the Zeiss StereoZoom V16 has a part called an Apotome that functions by moving a grid and reconstructing with the imaging software. A microscope system light allows you to have a very large field of view and remove the out of focus light in the z-direction.
Optical tissue clearing expands the type of samples that you can image with light microscopes. Your sample will determine the best clearing method as well as the imaging system. The past 7 years has seen many advances and modifications, so you will likely be able to find a general protocol for your sample. Just like all science, some refinement for the very best method will be necessary for your particular sample. Happy imaging!
To learn more about 4 Factors To Improve Flow Cytometry Cell Sorting Speed, and to get access to all of our advanced materials including 20 training videos, presentations, workbooks, and private group membership, get on the Flow Cytometry Mastery Class wait list.

ABOUT HEATHER BROWN-HARDING
Heather Brown-Harding, PhD, is currently the assistant director of Wake Forest Microscopy and graduate teaching faculty.She also maintains a small research group that works on imaging of host-pathogen interactions. Heather is passionate about making science accessible to everyone.High-quality research shouldn’t be exclusive to elite institutions or made incomprehensible by unnecessary jargon. She created the modules for Excite Microscopy with this mission.
In her free time, she enjoys playing with her cat & dog, trying out new craft ciders and painting.You can find her on twitter (@microscopyEd) a few times of day discussing new imaging techniques with peers.
More Written by Heather Brown-Harding


